Saturday, February 2, 2019

Pulling (pushing?) PEX.

Part of the refit job involves updating the plumbing. In my planning software under Plumbing are items that encompass things like through-hulls, seacocks, bile pumps and hoses, head and holding tank updates and fixtures. You get the idea.

Years ago while doing cabin sole replacement number one, I managed to run a screw right into the high-pressure supply line to the head while fastening the cabin sole in place. It didn’t take too much time hearing the pump along with its favorite sister, the bilge pump laboring away to figure out that I had a problem.

So, being the “let’s get’er done quick” kind of guy that I am, I simply cut out a section of the original grey tubing, fitted a section of clear Shields polyester reinforced PVC hose, double, double hose clamped it ‘cause I found out that single hose clamps on a non-barbed fitting, well, don’t last too long. The fix is under the floorboards so out’a sight, out’a mind...

Now is the time to make things right. In addition to adding a new hot and cold cockpit shower to the system, I am replacing the faucets in the galley and the head. So rather than put a dirty sock on a clean foot, I decided to replace all the factory plumbing. This also aided with tying in my new hot-water tank.

I didn’t spend too much time evaluating material choices. I read of Onne van der Wal doing this on his Pearson 36 refit and the “PEX” solution seemed the easiest. I used 1/2” SeaTech polyethylene tubing and their line of connectors. I ordered them through the Paxton catalog that my yard uses and had them put the costs on my bill.

Being a noob to plumbing I will say that the job was pretty simple and straightforward. The revelation for me was the fact that the tubing is not terribly flexible. I was under the impression, delusion really, that the pipe could be contorted into all sorts of tight bends and angles. Not so. This required a bit more in the way of connectors, mostly elbows that I had not planned on when I drew up a schematic of the new system. Paxton and my yard were happy to remedy that shortcoming.

Pulling all the old tubing and running the new probably took about a day and a half. Not too much elbow grease necessary. Wherever possible I used insulated marine electrical cable clamps to secure the tubing and in some cases to shape the radius of a curve. Pro tip: buy the tube cutter. 

One item that I envisioned doing was to create a manifold for the freshwater supply from the two 30-gallon tanks located under each main-cabin settee. C&C’s original approach was to add a valve to the supply line on each tank. When one went dry I pulled up the settee cushions and switched it closed and the other tank I put in open. Pretty simple. But in my usual “turn a sow’s ear into a silk purse” I figured I could combine those two valves into one and be done with it.

The more I thought about where to put the manifold and the extra time it would take I realized that it wasn’t worth it to me. I’m not going voyaging and we don’t use the boat enough to justify it. And I am waaaaay behind on this project.

The only “manifold” that I did construct was for the high-pressure side that supplies hot and cold water. Because I was going from two to three high pressure supply lines, I constructed a manifold that distributed to each using stackable “T’s” and elbows. There was no need to incorporate any valves in these, especially since the whole structure would be under the floorboards.

One thing that I did do as sort of a lark was to incorporate valves into each fresh-water tank’s vent line. I’ve known of instances where saltwater intake in the tanks happened, generally on long legs at deep heel angles. We’ll see how that works in the real world of the Chesapeake Bay and coastal cruising. My money is on overkill...

Next up: installing the new faucets and shower.

Note: Red lines used for the F/W tank vents are due to me running out of blue...

Old bilge old plumbing

Yuck….


FW tank fill shutoffNew filler hose with valve on vent line:

Starboard F/W tank hoses:

Starboard FW tank plumbing


Shot showing the fresh-water pump, expansion tank and hot-water heater hookups:

More PEX

Almost there:

Like the colors

And I will never see those line ID’s..
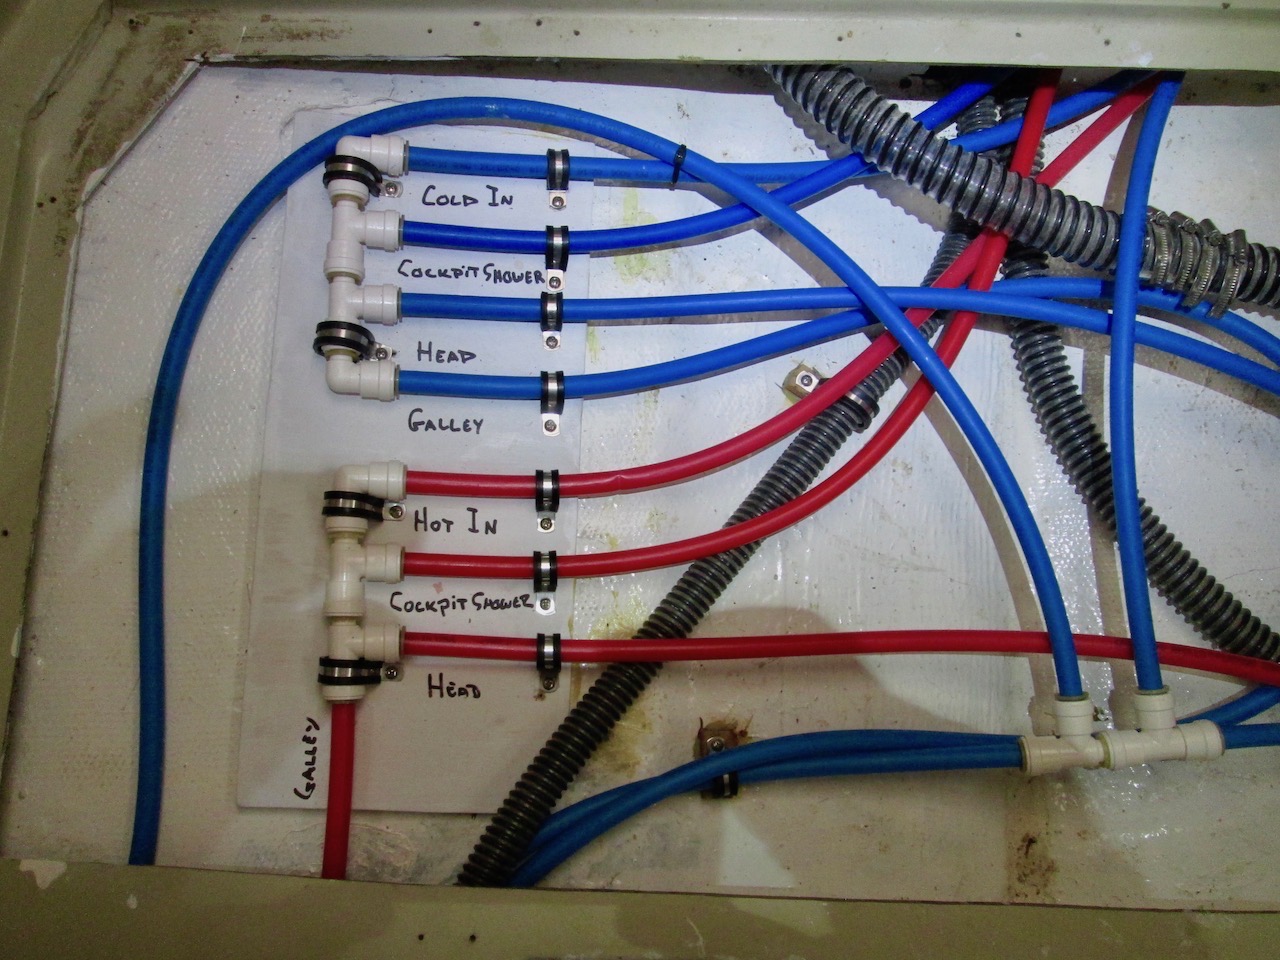
Completed manifold

Friday, September 29, 2017

I'm getting better with the spray gun. Sort of...

When I last left the deck painting task I had just finishing spraying the gloss topcoat. Even though I knew that I would probably get locked out by the falling temperatures I wanted to keep going as much as possible on the deck paint task so after pulling the tape and the paper, I started in on counter-taping for the definition of the non-skid areas. I probably finished about three quarters of it before Winter set in. 

I decided to leave everything in place and come back in the Spring to finish off the non-skid application. One decision was to leave the tape in place. I discussed this with a couple of painters and got differing options. Leave it it place because it wasn’t exposed to UV. Pull the tape because it would harden up and become difficult to pull. And lifting old tape might take some paint with it. I went with leaving the tape in place and avoiding re-taping the same areas again in the Spring.

I returned when the weather warmed up in May 2017. I finished taping the boat in order to apply the non-skid. I decided to use the AwlGrip recommended technique of rolling on the paint and “salting” the Griptex into the paint. This technique is nicely described as the best way to go for rank amateurs like me.

Actually, I had done some test panels last year and I thought the results were pretty good. I followed the instructions to roll on the Awlcraft topcoat. I used a 4” rounded-edge foam roller to apply the Awlcraft. I then came back with the Griptex, in a large plastic yogurt container with a bunch of holes punch in the lid and used the “salt” application method. The key is to keep shaking. That ensures that it covers evenly. After doing that I let the first coat of paint and Griptex sit for about 30 minutes then rolled another coat of Alwcraft. Waiting another 30 minutes I “salted” more Griptex, mostly to ensure that areas that may have been a bit thin were adequately covered. After yet another 30 minutes I rolled a third coat of Awlcraft on to seal the Griptex and take some of the edge out of the non-skid.

First coat of non-skid applied.

First coat of non-skid...

Better photos of new non-skid.

Fullsizeoutput 43f

Fullsizeoutput 440

One of things that I decided to do when repainting the decks was to upgrade the look of the deck. On Ronin there was non-skid everywhere. If the surface was horizontal, it had non-skid. If it was vertical is was painted gloss. As part of my obsession with turning a sow’s ear into a silk purse I decided to delineate the deck edges and hardware pads so that there was a glossy relief around each item. For instance I added a 1” gloss strip adjacent to the toenail which had never existed before. Eh, why not?

Kinda hard to see the fancy edging...

Fullsizeoutput 3b0

I was pretty pleased with the way it came out. But that was before I started to clean up.

Well, it turned out that when I started to removed the tape and paper the 3M tape all came off quite nicely. Good clean lines. However, in three areas, a good bit of the gloss topcoat lifted right off. On inspection it wasn’t the problem of leaving the tape on for too long. It seemed pretty clear to me that I had not prepped the surface well enough before laying down the topcoat. Large sections of perfectly sanded yellow epoxy primer were exposed. Dang.

Not quite the effect I was hoping to achieve.

Exposed primer

Exasperated, I just kept going knowing full well that more painting would be involved. Since I’m not charging myself for the job I wouldn’t be “losing" money, only my patience.

After re-covering the entire hull I sanded down the affected areas and back-tapped prior to shooting. Pulled out the mighty 3M spray gun and applied another coat of Awlquick primer. I let that set up for a couple of days and then came back and sanded with 320 grit for adhesion. On a good day with temperatures in the low 80’s and low humidity I resprayed the exposed areas with Awlcraft 2000. When finished I felt pretty good about my efforts yet again.

Fix it again….

Primer for repair areas and hatches

Looks good in this light.

After respray work

When I came back the next day and pulled the plastic and tape I saw that I STILL had not gotten it right. I had used a different sized (smaller) tip in my spray gun and at the same time adjusted the thinner, using a bit more than the original spray job. The result was that although the paint flowed out more evenly and better than the original effort,  the film thickness was too thin. Compared to the original paint the yellow of the primer in the respray areas was evident. Dang. And dang again...

So, as is my wont, I took the summer off and did other things. Spain, Slovenia, sailing in the Adriatic off Croatia. Riding. 

I’m now just getting back to fixing the fixes.

Green tape marks touch-up areas….

Job done

Anyway, I was out at the boat today and a gentleman who bought an original Cal 40 found in the yard and is now in the process of restoring came by to chat. Asked when I thought I might have Ronin in the water. I gave him my standard reply to that question: One and a half years. No matter when I’m asked...

Wednesday, August 30, 2017

Hello? Hello? Is this mic on? Hello?

Jeez, it’s been so long since I’ve posted I’ve forgotten how to do it.

Have I been beavering away on the refit project? Nope. Are things getting done on the boat? Yes. And no. Do I feel guilty about it or stressed? No.

To really hammer it all home I read the articles in Cruising World magazine by Onne Van Der Wal about purchasing an older Pearson 36, him hauling it into his driveway and spending less than a year doing exactly what I am doing. But really, what he did and the time frame that he completed it in is truly impressive. My new boat refit hero!

So, where was I? Oh yes, finished spraying the gloss topcoat on the decks just before winter shut the painting opportunities down. Nine months have gone by. Almost a year. I had high hopes that with heaters and moderate temperatures I would spend a good deal of time in the shed working on interior projects but that didn’t pan out. Some of it due to the fact that many of the projects involved having the deck hardware back in place. Which I couldn’t do because I had not finished the deck repaint task. The gloss was on and the boat taped in anticipation of applying the non-skid. Temperatures were too cold to apply the Awlcraft 2000 with non-skid so I just left the boat taped and spent the winter watching TV.

No, actually I don’t watch TV. Did go to Sarasota Florida and race in the Corsair Nationals. Trip to California to ride my Ducati with a good friend. Another off-road motorcycle riding week in Utah with my brother and friends. Did the Down the Bay race in May as the “Two" part of the Two-handed race on an Andrews 28 sport boat. We finished first, almost getting line honors but passed by a J-124 in the last mile. Fun in starting conditions of 25 knots, gusts over 30 knots. Back to Barcelona, Slovenia and Croatia for a month. Spent a week on a 54’ Jeanneau in the Adriatic. I wished I had been on our C&C 37, a much finer sailing machine.

One thing I did do last year was contact a local rigging company and get an estimate on replacing almost all the standing rigging and all of the running rigging and lifelines. We discussed replacing the original Navtec rod rigging with stranded wire, especially in light of the fact that Navtec had just gone out of business. I opted to stay with the rod rigging, especially given that I had already spent a good amount of money on the new tang fittings years ago. 

Pulling the rig apart.

.Fullsizeoutput 421

Old aluminum.

.Fullsizeoutput 420

Having all new rigging is going to give me a good bit of confidence in the safety of our boat. Worth the money and effort.

Next post: The trials of not being an expert spray painter. Or even a moderately good one...


Saturday, November 19, 2016

A big milestone, the decks get the gloss paint.

I finished the taping and masking yesterday at 3:30 PM yesterday. Even though I was pressing to get the boat ready to paint today, part of the day was taken up with conferring with the rigger. He and his partner showed up at the yard around noon and we went over the mast. He’ll get back to me with options and pricing for the work. Which is just the way I like it. We traded boat disaster stories which is always fun.

Last of the taping.

Masking done

After getting home I had some dinner and the spent the rest of the evening getting all my gear together for painting. This morning I went over to my friend’s house and picked up his generator.

Arriving at the boatyard around 9:00 AM  today I started laying out the materials and equipment. As I suspected, the shed ceiling was dripping with condensation and the decks were moist, to put it mildly. I set up a couple of fans to help with airflow and wiped all the surfaces with rags to speed drying.

Sill, it wasn’t until 10:30 that I could start in on the pre-paint deck prep. I vacuumed the decks for the millionth damn time, made a few quick repairs to taping mistakes  and then started in on the two-rag solvent wipe-down. After that it was time to mix up the Awlcraft 2000 and let it induct.

By the time I jacked the spray gun in and started at the bow, it was 12:30. I knew right then that I’d be finishing near sundown.

I started out pretty nicely. Easy to lay down the first coat with no problems. Man, I thought I was gonna breeze right through this job.

Yeah. No.

Started well...

First gloss coat

What with the fact that I had to contort myself in weird positions without ever being able to stand up straight, my back started to spasm. Oh joy. Add in me wearing these damn booties that kept pulling off my feet and the quality and ease of the work began to fade. If I had a dollar for every time I looked down after stepping in fresh paint, well, you know...

Anyway, I kept at for for three passes. Finished up around 4:30, cleaned up the gun and policed the job site and that was that. Took a few photos in the dimming afternoon light and headed home as the front started to move through. I managed to get the paint on before the season shut me down.

I was pretty happy about that, getting a major task finished. Pumped really.

Next up is to take a day or two off, eat something other than chili or bean soup, meet my wife who’ll be coming back from three weeks in Barcelona. After that I’ll start in applying the non-skid paint areas.

Final product.

Better than before

Coat three on stern

View from the bow

Whats with the orange

I’m going to take some better photos tomorrow. You know, the ones showing the shiny glossy paint. With the bugs and footprints in it...


Wednesday, November 16, 2016

Pushing to beat the cold front.

Looks like this coming Saturday will be D-Day for getting the gloss topcoat painted. Weather forecast for low to mid sixties followed by a cold front. I suspect that the cold front will finally signal the end of our warm weather.

I’m pushing pretty hard most days to get the taping and masking done. I figure that I’ll be done with that by Thursday evening, early Friday morning at the latest. That will give me Friday to do a final clean of the decks, clear away the area around the boat and get all the gear running and tested prior to shooting the Awlcraft on Saturday.

With the cooler nights every morning there is a fair amount of condensation dripping off the ceiling of the boat shed. Temperatures warm up pretty quickly once the sun is out so I should be able to safely start spraying by around 11:00 AM on Saturday.

There’s no cushion in my schedule but I’m confident that the first gloss coat will be on by Saturday afternoon. After that I can “leisurely” roll on the non-skid surfaces. Of course that involves more re-taping and masking those areas. Which is not a simple job as I’m finding out.

Some photos from the last three days.

Starting at the bow

Track placement

Starting to tape the upper deck structures.

First pass on upper deck

Spent all of today placing and outlining the hardware fitment.

Scattered bits

Pushing into the afternoon

For some reason I became concerned about some chips in the upper port side of the companionway entrance. I had ignored them because I mistakenly thought that the new teak surrounds that I made last winter in the shed would cover them. Nope.

I mixed up some Awlfair, slapped it on and put the heat lamp on it. It will get a basic fairing job which will not be ideal but will have to do. I can come back next Spring and fix it up as need be. 

Fitment looks okay.

Checking new surrounds

Back at it early tomorrow.

Sunday, November 6, 2016

I think I'm done with the sanding.

With the weather cooperating and after getting back from helping my brother and sister-in-law put on a 3-day, 100-mile endurance race in the Shenandoah Valley, I’ve been pushing to get the deck ready for the gloss topcoat application.

Over the years I’ve surfed the internet for examples of others painting their boats in order to get some sense of what I’m up against and how to go about it. It seems to me that all those guys get their tasks done pretty quickly and efficiently. That is not what I am experiencing.

I’ve spent two or three days just block sanding and machine sanding the primer with 320 grit for the final surface. My fingers are raw from digging into the corners and along the toerail. I finally started to “cheat” and use my Mirka sander because time is running out with the onset of the Fall season.

Protection is key.

Tired of finish sanding

With the final sanding complete I did a quick vacuum and then pulled out the masking supplies box and got to work. I started with the cockpit sole because I was tired of grinding sanding dust and yard dirt into the clean sanded primer and wanted it protected with some sturdy paper.

Protected.

This took an afternoon

What to me seemed a quick and simple job took an entire afternoon. I knew right then that I was not going be spraying the gloss coat after three days of taping as I had planned. 

Okay, I decided to take a deep breath and go into Zen mode. The prep work will get done when it gets done. The ace up my sleeve is that I called my brother and asked if I could borrow his 125,000 BTU diesel fired radiant heater.  Confirmed. Just in case the temperatures dropped out before I could pull out the spray gun...

So, every day I get up, get breakfast, drive to the yard and start the very, very slow process of taping out the gloss areas with 3M 218 Fine Line tape. Lay it down, draw out the outline, cut out outlines for each stanchion base, cleat and mounted hardware. Incredibly time-consuming. It will take many days of this process. And my knees are wrecked.

I hauled the pushpit over to the yard and set it on the stern. With that in place I could outline the stanchion feet, flagpole base and an area for some miscellaneous wiring for the stern light and GPS antennas exiting the deck.

Why does the stern looks so small?

Tiny butt

Old habits are hard to break. Every damn time I would climb up the steps to start into the cockpit I would grab the top rail of the pushpit for support. And every damn time it would start to rock back off the stern. You’d think I would learn...

More taping.

Starting to mask

Tape is expensive

Expose the gloss areas

After about 3 days of work I am just finishing up running the tape up the starboard side. Lots of stops along the way to figure out the outlines for the gloss areas for the rest of the stanchion bases, diesel and water deck fills and the head pump-out deck fitting, a plate for the chainplate and the channel sides for the deck scupper drains.

Now, full disclosure; I have no one but myself to blame for this. None of those cutouts and fancy curves existed in the original deck layout. C&C simply sprayed non-skid over 90% of the flat deck areas. It was me that decided to sex it up a bit and add the gloss cutouts and line along the toe-rail. Some of the impetus for that was to make sure that any fittings were sitting on smooth surfaces so that there would be a good seal when I stared to put the deck fittings back on. And mostly because I just thought given all the time I’m putting into this effort I might as well make it look like a Hinckley.

Yeah, good luck with that...

One day’s worth:

Running the starboard side

Sophisticaled tools

As part of the project I’ve gotten in touch with a local rigger. He’ll be out in the next week or so to go over my list of tasks for re-doing the rigging. Looks like new rod and most certainly new running rigging, wiring and coax.

Sad old mast.

Tired old rig

And I wished that we would just stay on Daylight Savings Time...

Tuesday, October 25, 2016

If I never see another pinhole it will be too soon.

I’m trying to spend more time on the refit project especially with the favorable weather that we’re having. After getting back from the Dominican Republic I have redouble the final effort to put on the Awlquick primer and sand it in preparation for applying the topcoat.

I knew before leaving that there were some serious mistakes that I had made fairing nicks, gouges, cracks and glasswork in preparation for the gloss topcoat. The number of those mistakes were a bit depressing. Especially after I came back and and filled them with Awlfair. I sanded all the builtup fairing compound and applied more Awlfair, let that set up for a day and then sanded again. After doing this I mixed up another batch of Awlfair and spot sprayed.

Fix those cracks and scratches.

Awlfair touchup work

And lo and behold, more pinholes appeared. Some in areas that I thought I had fixed and some new ones. Frustrating.

Too tiny to see in the photo but they’re there.

Awlfair failure

One section of the port scupper drain showed another set of holes that had blown open next to an area that I filled. Closer investigation with a sharp knife revealed yet more glass layup failures. I should have really tested the entire length of the affected area to ensure that I repaired everything prior to spraying the primer.

Bad layup blown open.

Another set of layup failures

The voids in the scupper drain required something more industrial. Out came the West System mixed with colloidal silica shoved into the opened cavities. This area would not be ready for sanding and painting within the day but I’ll just do that in the next day or so and “paint” that area with primer.

So, with just enough of the original gallon of primer left I tried a different tack with the pinholes. 3M Arcyl-White Glazing Putty. I should have used that earlier. It is easier to apply in small amounts and has the benefit of being ready for sanding after 30 minutes. I did a closer inspection of areas that I knew were suspect, smoothing on the glazing compound as I went. Sanding with 220 grit sandpaper was enough before painting.

Glazing compound. Should have used it sooner.

Glazing putty to the rescue

While waiting for those areas to set up I started in on final sanding the surfaces that will be painted with the gloss topcoat. I had already machine sanded the entire first primer coat on the decks with 320 grit sandpaper. The key to getting a nice finish with the Awlcraft 2000 is to final sand those areas using 3M Dry-Guide and more 320 grit sandpaper. Block sanding by hand.

Hand sanding the primer isn’t very hard and the results using the Dry-Guide are sublime but it does take time. I anticipate several days of that coming up.

Smoothing the surfaces.

Dry guide sanding section

Once the glazing compound set up and sanded I fired up the compressor, mixed the last of the Awlquick and applied covering coats.

More primer needed.

Final spot repairs

So, at the end of the day I am 99.99% done with applying Awlquick epoxy primer. Next installment, after I get back from four days of helping my brother and sister-in-law run a 3-day Endurance ride in Fort Valley I will finish the block sanding and start in on masking the non-skid and gloss patterns.

Covered.

Awlquick touchup pass