Thursday, November 20, 2014

Cabin Sole Replacement - Round 2


About 13 years ago I replaced the entire cabin sole. As the boat was a bank repo, the original cabin sole was delaminating, worn out and in one place directly in front of the companionway steps, completely broken through. Since we had other priorities for the first couple of years, we screwed down a section of cheap plywood to keep folks from breaking their ankles and essentially ignored the condition of the rest of the flooring.

When we threw out all the original cushions and decided to have new ones made. The new cushions set against peeling plywood laminate was not going to impress folks. Or us.

We bought 15 yards of close-out Ultrasuede from close friends in the fabric business for an absurdly low price, contracted with a local boating canvas guru and had all new cushions made. From there it was on to replace the cabin sole.

I purchased two sheets of 18mm (~3/4”) x 4’ x 8’ teak-and-holly plywood and arranged to use the basement of a fellow racer and good friend since my condo rules probably weren’t going to allow me to stink up the place with varnish and epoxy fumes. I pulled the original flooring as templates and after sanding, epoxying, varnishing, cutting, routing and 1/4” x 3/4” teak edging that I had ripped, the flooring went in. It looked magnificent.

But. There were built in problems from the beginning. These issues finally reared their head after about 10 years of use.

When I didn’t do was, despite completely coating all the surfaces and edges with several coats of epoxy, was get ALL of the edges sealed. The reason for this is that I not so cleverly finished both sheets of plywood before making the cutouts. So, during the install phase, and when another good buddy who had done boat cabinetry gave me a hand, we just routed out out the shape and nailed the teak edging in place.

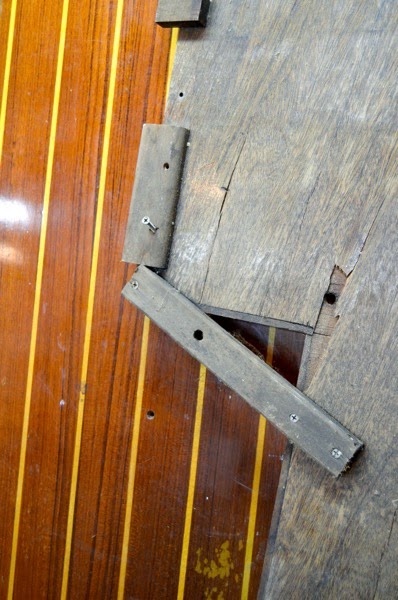
So, over the years and a few incidents of high water and just plain moisture in the bilge, the replacement cabin sole started to give up.

Replacement flooring gone bad:

DSC 0002

DSC 0003

DSC 0006

The weather has turned unseasonably cold so there is no more work to be done on the hull and decks. I purchased another two sheets of teak-and-holly plywood, which interestingly cost me less this time and brought them to my new shed. At least I won’t have to bother my old friend again. Especially given that he has stopped boating and gave me all his boat building supplies, of which there is a really nice vacuum pump along with all the sheeting and System Three epoxy that I could ever use. A good friend indeed.

So far, all that has been done is to layout the new and old plywood to make sure that things will line up and that the cuts will be correct. Pretty expense mistake if I get it wrong.

New and old plywood in the shed:

DSC 0020

Protecting the surface of the new plywood:

DSC 0041

Removing supports and screws:

DSC 0044

Checking alignment:

DSC 0051

Getting ready to trace the template outlines:

DSC 0056

That’s all the work that I did for the afternoon. In the next couple of days I expect to start cutting and routing. With the exception of West System epoxy, I don’t have any finishing product yet but I’m looking seriously at the new AwlBrite product in a semi-gloss. The original flooring was finished in many coats of gloss varnish and I’m not inclined to go that route again.

Thursday, November 6, 2014

Time Shift - Deck Repairs

Since I’m not posting on a continuum here, I thought I’d add a short post about what I found while doing some deck repairs. It was “interesting."

One of the former owners had done or had someone do some “quick” deck repair to the areas radiating out from the inboard ends of the stanchions that are used for the gates. On our boat we have gates port and starboard in line with the cockpit bulkhead. As stands to reason, as people, including me, grabbed them to haul themselves up or just to get aboard, the levering action seemed to have really put a lot of stress in that area. I assumed that the fix involved replacing core and adding fiberglass but that appears to not have been the case. It seems that essentially someone just ground out the stress cracks, filled them in and did a quick paint and non-skid cover.

Port side deck at lifeline gate:

IMG 0829

So after attacking the deck with my trusty grinder I discovered the good and the bad. 

The Bad: It seems that when C&C built the deck it smartly designed it so that the areas that are on top of the hull are solid glass. Good idea in theory. But what seems to have happened is that as the deck layup transitioned/tapered from the core areas to the solid glass areas, the overall thickness of the laminate became very thin. So what happened is that the area was prone to movement throughout. Constant springing whenever the stanchion was pulled on.

I would guess that the total thickness of the deck at the area where it overlaps the hull, just before and under the toe-rail to be at best 3/8” thick. In the area where there was still some coring, in this case some very thin foam, the bottom laminate layup was exceeding thin, maybe 1/16”.

Initial grinding and exposure:

IMG 0813

After cutting and removing the lower laminate schedule:

IMG 0824

So, the Good News: the core was dry! Even the plywood that was used instead of balsa core. Not sure if that was put in at the factory or if it was part of the initial repair. From the looks of it I think that the factory used plywood...

Anyway, I ground out the area on a 12-to-1 radius, based on the thickness of the top laminate layer, cleaned every thing up and formed sections of pre-made 1/4” FRP and epoxied them into place as replacement for the 1/2” balsa core.

First layup:

IMG 0827

While that section was curing, I moved over to the port side. Closer inspection lead me to believe that all that was compromised was the up level of the laminate that have a few stress cracks in it. It seemed to be a good bit stiffer that the starboard side so I decided to just grind out the area and re-glass it.

First look:

IMG 0830

When I was finished grinding and cleaning the area I cut sections of biaxial cloth along with as small section of 10 oz cloth and epoxied them into place.

Layout and epoxiing:

IMG 0835

IMG 0836

More to come after the epoxy sets up. Waiting for the rain to stop...


Sunday, November 2, 2014

Refurbishing the centerline table.

More from the “What I did last winter” photo archives.

The centerline folding leaf table in the main cabin was a mess from the day we bought the boat. And given other priorities it stayed that way while we used the boat. With the refit underway and while I was casting about for projects to complete last winter when I was unable to work on the boat while in the slip I pulled the table and went to work on it.

Like most of the woodwork and laminate on Ronin, it was in bad shape. The fiddles had been worked loose over time. The laminate was stained and dirty. The edge banding was peeling off and mostly gone. This was an easy fix and satisfying to do.

Table in rough shape:

IMG 3457

I removed the loose fiddles and set them aside. The piano hinges and most of the locking hardware was removed and the leaves set aside.

One thing that I did before doing the actual repair work was to sand the teak and give it a good teak oiling. There was a reason why did the teak oiling was first and I’m not sure why did it but it worked out okay.

Oiling the teak:

IMG 0331

IMG 0330

I removed all the original teak edge banding with a chisel and sanded the exposed plywood. I had ordered new teak edge banding and started in on applying it. Now, I didn’t RTFM, which I couldn’t find anyway in my mess of a shed so I used my heat gun to soften the pre-glueded strips as I slowly worked it down the line. It was only after completing the entire project that I found out that the way to apply it was to simply use a hot iron...

The hard(er) way of apply the edge banding:

IMG 3467

IMG 3507

The next step was to over-drill the worn out screw holes for the loose fiddles. I filled the oversized holes, gluing in short sections of wooden dowel and sanding them flush.

Prepping the old screw holes:

IMG 3506

Before I reinstalled the fiddles, I had to clean up the original laminate. Like the rest of the boat it was stained and dirty. Cleaning just wasn't working well enough for me so I decided to try something different. I sanded the laminate with a quarter-sheet sander and 220 grit sandpaper. For the corner work I used 3M scrub pads and sanding pads. Although some of the “texture” of the original laminate flattened out a bit, it came out looking like new. I was pleased with the results.

Cleaning up the laminate:

IMG 3484

IMG 3488

Along with the laminate sanding I took the sanding pads to the original chrome-plated fittings which were pitted and rough. That worked out well too.

Scrub away!:

IMG 3496

I was able to finally add the teak fiddles, pre-drilling and attaching them with all new screws and then gluing in new teak bungs that I made from some scrap teak that I had lying around.

Waiting for the chisel and some finish sanding:

IMG 3519

I didn’t take any pictures of the “final” product but it looks good and is in my attic waiting to be put back in the boat after I replace the cabin-sole. Another project for this coming winter...

A friendly little Black Widow spider kindly helping me with the table:

IMG 3473

New Distribution Panels

Another project that I did last winter in my shed.

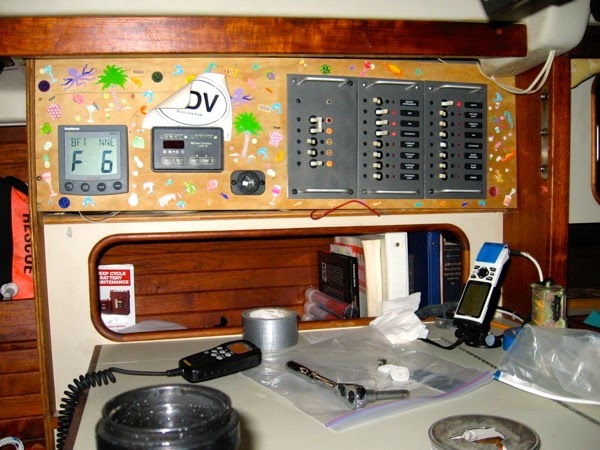
Part of the re-wiring project involved all new distribution panels for the navigation station. As I had mentioned earlier, the original panels were really showing their age. Not enough breakers for what I envisioned and even with the minimal items that we had there were several case of one breaker being used to service two or more loads. Not ideal.

The wiring was pulled and labeled and ready for the new panels. I chose Blue Sea Systems panels, specifically what they now refer to as their “Traditional Metal Panels.” When I bought them, the new “360” Panels were just being produced and were roughly twice the price. Sexier and a bit smaller but the traditional was fine by me.

The original factory distribution layout was composed of one 120V AC panel with AC Main and 3 positions. Functionally this panel was fine because it was only being used for the hot water heater and the cabin 120V AC outlets. The new panel will be have a Main and 6 positions but the bottom 3 will be for future use. Future use meaning if the new owners of the boat want to add a microwave or hot-tub...

On the DC side of the equation, the original setup had two panels of 6 positions each. Not quite enough and I had used single breakers to power dual devices in a few cases. I needed a few more positions so I opted for 3 panels of 6 positions each. Based on original plans for devices almost all of the breakers will be used.

Old “Temporary” panel:

IMG 0876

Newer mockup distribution panel:

Photo 1

With a basic setup in mind I purchased some cheap 1/2” plywood from Lowes and ordered some, well, actually a half-sheet of Wilsonart kitchen countertop laminate in a interesting dark color and pattern.

With the mockup fitted to the space I cut the plywood and traced the cutout template. Using a hole saw and my trusty Bosch jigsaw I did the cutouts. With that done I spread on the contact cement and rolled on the laminate. After a day of letting the contact cement set up, I routed out the openings in the laminate.

IMG 3711

The panels were arranged and screwed into place along with base for the Link 20 and the Raymarine ST60 Multi repeater. Just to the right of the Multi readout I cut two holes for a basic 12V DC cigarette outlet and a dual USB outlet, both from Blue Sea Systems.

Panel under construction:

IMG 3727

IMG 3729

For this iteration I did not use the piano hinge that was on the temporary mockup because I’m not sure that this panel I was working will actually go into the boat. In all likelyhood on the final panel I will use a marine plywood and add the piano hinge on the bottom. The original panel installed by C&C required that each distribution panel be unscrewed and pulled out in order to get at the wiring. This was inconvenient and frustrating.

Semi-final distribution panel (with original hacked up melamine panel in front):

IMG 3831

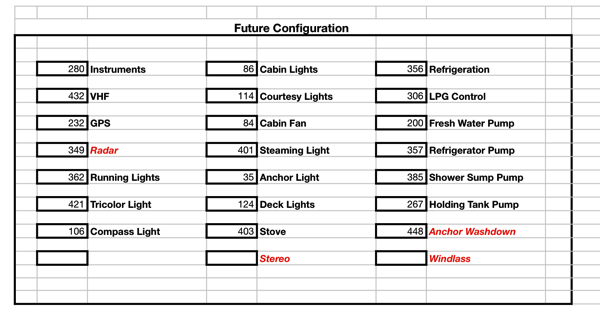
First cut at assigning devices to breakers:

12VDC Layout Screenshot

Saturday, November 1, 2014

A Major Step Forward - Hardware Removal

In early August I started in on removing the deck hardware from Ronin in anticipation of prepping the decks for painting. While the boat was in the slip I started removing winches, cleats, turning blocks, track and pretty much anything that was secured to the deck. A old work buddy of mine, John, was in town from Kansas for few days and made the mistake of volunteering to help me. I needed it as some of the removal required two people.

By and large the hardware came off fairly easily. C&C did a good job of mounting and bedding the hardware. With the exception of the secondary winches and some rope clutches that a previous owner and I installed, all the holes were chamfered and butyl was used for the bedding compound. I’ve been very surprised by the lack of water infiltration into the core. So far almost of all the items that I have pulled have not had any rotten balsa core. I was expecting quite a bit worse but this says good things for the quality that C&C put into the deck hardware build. I know I won’t get away free but this means a lot less effort getting the decks ready for painting.

Jib tracks coming off:

Jib Track Coming Off

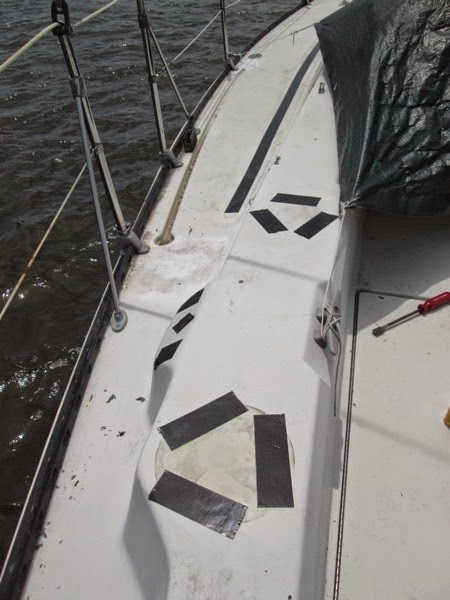
When I pulled the hardware there were a multitude of holes in the deck which is to be expected. I didn’t want to plug the holes with a dollop of clear silicone sealant like I had with the coach handrails that were pulled off over a year ago. I've read about the problems that silicone causes when trying to clean and prep the surface for painting.

So, in the vein of “better ideas”, I decided that just taping over the holes with duct tape would be fine. Pure lazy think. It did not work, So, after the first rainfall (outside and in…) filled my bilge I belatedly decided to pull the tape. I had cleverly applied the black Gorilla tape in the late summer heat. Think gooey, sticky mess when removing the tape.

One of several bad ideas that I’ve had:

IMG 0245

So, much scraping and wiping down with mineral spirits later, I had another brilliant idea: West System! Yup, I figured that since I was going to be sanding, repairing, glassing and epoxying the decks for painting anyway, why not just fill the holes with West System epoxy thickened with 407 Low Density thickener. Many swiped with a plastic squeegee later I had a very dry boat. Ugly but dry.

Chicken Pox:

IMG 0504

After a couple of days of intermittent work I had the big items off and ready for storage. Most of the items will go in my shed but some will stay outside with the boom and other large aluminum and steel parts.

Bucket ‘o Winches:

IMG 0169

I set one of the primary winches aside and a few days later put it on my workbench to check it out. Yeesh, what an un-serviced mess. Shame on me. So after doing a check to make sure everything was there and working, I stored them for a future maintenance project inside the warm and toasty shed when it’s cold outside and boat work slows.

Badly treated winches:

IMG 0248

IMG 0251